In this guitar lesson we’re going finish off our series of lessons on frequently used note values. To do this we’ll be taking a look at sixteenth notes.
If you’ve gone through all the previous lessons on rhythm, then you’ll most likely be able to guess the following rule…
This means that if a whole note is four beats long, then a sixteenth note is a note that lasts for one quarter of a beat. Although this might sound a bit intimidating, they’re not too bad to play as long as your eighth note timing is rock solid.(Side Note: If you aren’t yet comfortable with playing eighth notes, then you should definitely work on those before starting to tackle sixteenth notes).
Symbols For Sixteenth Notes


If you look to the left, you can see a symbol for a solitary sixteenth note. At first glance it looks quite similar to the symbol of an eighth note. But notice how that there are two flags attached to the tail. (You might want to quickly review the lesson on eighth notes now so that you can compare the symbols).
On the right hand side of this paragraph you can see another common way that you’ll see a single sixteenth notes written in music.
Now that we’ve at the symbols for one sixteenth note, it’s important that we look at what happens when there are more than one…
Beaming Sixteenth Notes
Like eighth notes, it’s very common practice to beam multiple sixteenth notes together. This is done to make the beats of the music more obvious to see. To help you get an idea what I mean, let’s write out four beats worth of sixteenth notes…
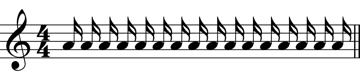
Example 1: No Beaming Used
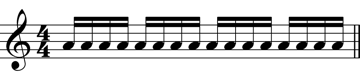
Example 2: Beaming Used
Notice how the example with no beaming looks like a total mess. It’s extremely hard to see where each beat begins and ends. It’s also hard to see at a glance just how many sixteenth notes there are.
On the other hand, by beaming the sixteenth notes in groups of four it makes two things very easy to see…
- How many sixteenth notes we need to play.
- Which sixteenth note falls on the metronome click. (This will be the first sixteenth note of each group).
Sixteenth Note Timing Exercise
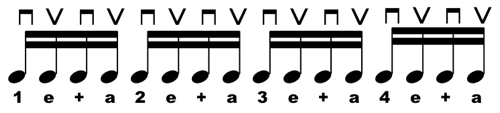
Shown above is the timing exercise for this lesson. Before you start practising it, I need to point out a couple of things to you…
Pick Motions
Notice how I’ve written the pick direction symbols above the exercise. You’ll need to use alternate picking for the entire exercise, making sure that…
- The first and third sixteenth notes of each beat are played using downstrokes.
- The second and fourth sixteenth notes of each beat are played with upstrokes.
Counting
Because you’ll be playing four evenly-spaced notes per beat, this means that you’ll need to use a four syllable counting method. The method I’ve written on the exercise is the same one my classical piano teacher taught me when I was a kid. When you use this method of counting, you’ll need to say: “One-e-an-duh Two-e-an-duh Three-e-an-duh Four-e-an-duh”.
Let’s now look at the steps you need to follow…
- Choose a single note to play on your guitar.
- Turn on your metronome and set it to click at 60 bpm.
- Using alternate picking, play the note you selected in Step 1 using sixteenth note timing.
- Play the note repeatedly for at least a couple of minutes using sixteenth note timing.
As I’ve mentioned before, I think it’s a great idea to tap your foot to the metronome click when doing timing exercises. I also recommend, at least in the initial stages of learning the exercise, to say the counting out aloud. When you become comfortable with the exercise, then you can stop counting and just do it by feel.
When you have mastered this timing exercise using alternate picking, then I highly recommend practising it using all downstrokes.
Sixteenth Note Chord Progression
Now it’s time to revisit the chord progression that we’ve been focusing on in this series of lessons. This time around, we’re going to use a whole bunch of sixteenth notes…
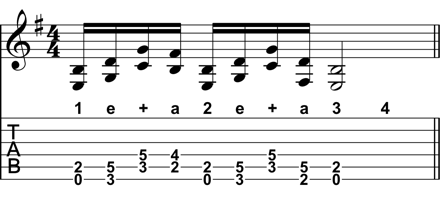
With this way of playing the chord progression we’re using two beats worth of sixteenth notes followed by a chord that’s being played as a half note. This means that the whole progression now only lasts for a paltry four beats.
As I mentioned in the lesson on eighth notes, I think that this progression sounds best when played using all downstrokes. But if you like the sound of the chords being played with alternate picking, then feel free to do that instead.
A Few Last Words
Over the last five lessons on rhythm we’ve looked at the following types of note values…
- Whole Notes
- Half Notes
- Quarter Notes
- Eighth Notes
- Sixteenth Notes
Although these certainly aren’t the only note values used in music, understanding and mastering them will definitely help you to build a strong rhythmic foundation. So be sure to include some form of rhythm practice in your weekly practice schedule. For Example: You could practice all of the basic timing exercises each week until you can play them all at 120 bpm or faster. (Side Note: I personally worked on them when I was younger until I could play them all at 208 bpm, and it was time well spent!).
In the next Rhythm Basics lesson, we’ll be taking a look at time signatures which are an essential part of understanding rhythm.
Until then, keep on working hard on the timing exercises and chord progressions.
Have fun!
Return To: Guitar Music Theory Lessons