In this guitar lesson we’re going to be exploring eighth notes, which are an extremely important note value used in a tremendous amount of music. But before we take a look at the eighth notes, let’s quickly review the note values we’ve looked at so far…
A Quick Review
In the previous three lessons we looked at three different types of note values…
| Note Value | Symbol | Meaning |
|---|---|---|
| Whole Note | A note that lasts for four beats. | |
| Half Note | A note that lasts for two beats. | |
| Quarter Note | A note that lasts for one beats. |
I need to confess here that this table is somewhat of a white lie. This is because there are times when the note values won’t last for the number of beats that I’ve mentioned in the table. (I’ll be talking about these worrying aberrations when we look at time signatures). But for now, just remember what’s in the table, and we’ll worry about the exceptions later on. 🙂
Even though the exact number of beats each note value lasts for might change, what doesn’t change is the relative proportions of the note values. This is great news, because we can now state a couple of rules that will never change…
- A half note is always half of the length of a whole note.
- A quarter note is always quarter of the length of a whole note.
Introducing Eighth Notes
Now that we’ve reviewed some of the earlier material, let’s now take a look at eighth notes. Since we’ve just stated a couple of firm rules, let’s write one for eighth notes…
Using this rule, if we know that a whole note lasts for four beats, then that means that an eighth note is a note that lasts for half a beat.
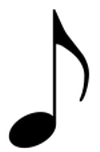
 Eighth notes are quite an interesting type of note value because you’ll see them written in a number of different ways. If you look to the left you can see what a single eighth note looks like. Notice how it looks very similar to what a quarter note looks like. The main difference is that it has a curved line attached to the tail. (I call this a flag, but you’re free to come up with a more catchy name if you want).
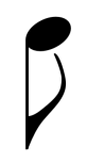
If you now look to the right you can see another way you’ll frequently see eighth notes written in music. With this variation, the tail is attached in the left hand side of the note head, and the flag is hovering directly over the note head.
Beaming Eighth Notes
In musical notation, it’s common practice to beam multiple eighth notes together. This is done to make it easier to see where each new beat falls. For Example: Let’s say that we wanted to write down four eighth notes in a row. There are two commonly used ways of notating this…
Method 1: Eighth Notes Beamed In Groups Of Two

Method 2: Eighth Notes Beamed In Groups Of Four
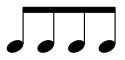
Even though the way the eighth notes are beamed together are different, it’s important to realise that they mean the same thing. (i.e. four eighth notes).
Eighth Note Timing Exercise
Now that we’ve gotten eighth note symbols out of the way, here’s a really good exercise for practising them…
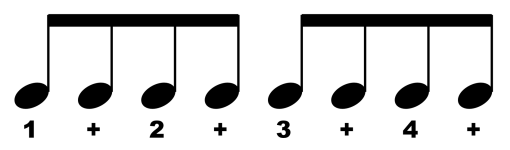
Because an eighth note lasts for half a beat, this means you’ll now have to play two evenly-spaced notes for every click of your metronome. If you’re not blessed with naturally good timing, then this can be a bit of a challenge.
If you look at the exercise you’ll see I’ve written + symbols underneath every second eighth note. When you count these notes with the + symbol, you should say the word “and”. This means that when you count the exercise out aloud you’ll say: “One, And, Two, And, Three, And, Four, And”.
If you’ve done all the previous timing exercises, then you might be tempted to skip reading the steps I’m about to outline. But that would be a mistake. Why? Because we’re going to change the steps slightly. So be sure to read the instructions closely. 🙂
Here are the steps that you need to follow…
- Decide on a single note on your guitar to play. (It doesn’t matter which one you choose).
- Turn on your metronome and set it to 60 bpm.
- Using alternate picking, play the note you chose in Step 1 using eighth note timing. Be sure that you use a downstroke on the notes that fall on the metronome click, and use an upstroke on the notes that fall on the +.
- Keep playing the note repeatedly using eighth note timing for at least a couple of minutes.
Practice Tip
When you are totally comfortable with playing eighth notes using alternate picking, then it would be a great idea to work on the timing exercise using all downstrokes. Doing this will help you in a few ways…
- It will make you more technically versatile.
- It will help you to internalize the eighth note timing on a deeper level.
- It will prepare your picking-hand for playing sixteenth notes. (We’ll talk about these in the next lesson).
Eighth Note Chord Progression
Here’s out trusty chord progression, but this time around we’re going to play it using mainly eighth notes…
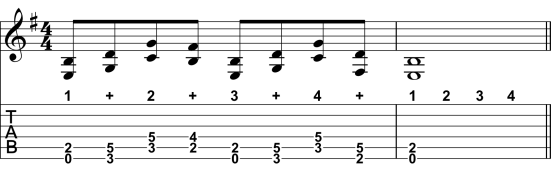
Because most of the progression is now being played using eighth notes, this means that the total length of the progression is now only 8 beats.
As well as being shorter, we now have an interesting technical dilemma. If you play the progression using alternate picking, like I recommend in the timing exercise, you may find that it introduces a certain unevenness to the sound of the chords. (To my ears, the chords being played with a downstroke sound slightly different than the chords being played with an upstroke).
To help remedy this potentially annoying unevenness, I recommend learning to play the chord progression using all downstrokes. Of course, if you prefer the sound of it being played using alternate picking, then feel free to ignore my sage advice. 🙂
A Few Last Words
That’s all for this lesson. In the next lesson we’re going to take a look at sixteenth notes. So it would be prudent to make sure you have mastered all the timing exercises and chord progressions that we’ve covered to date.
Have fun!
Return To: Guitar Music Theory Lessons