In this guitar lesson we’re going to expand upon what we talked about in the last lesson on octaves. To do this we’re going to look at three new octave fingerings that I think every rock guitarist should learn. I’ll also show you an example lick that will hopefully inspire you to integrate octaves into your own playing.
Let’s jump right in and take a look at the fingerings for this lesson…
Three New Octave Fingerings
These fingerings are far less common than the ones from the last lesson. Despite that, I feel that they are incredibly useful to know. They will help open you up to many new melodic possibilities. 🙂
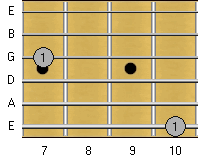
Octave Fingering 5: E-string and G-string
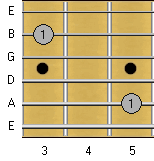
Octave Fingering 6: A-string and B-string
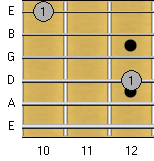
Octave Fingering 7: D-string and E-string
As you can see, these fingerings are a little bit trickier than the first four. The two main challenges that we have are…
- You need to skip two strings in order to play the octave. This makes the job of muting the strings in between the octave notes much harder. It also makes strumming the octave a less viable option. Even if you mute effectively, in my opinion, the octave still doesn’t sound great if you strum it.
- They are physically harder to play in a relaxed manner. The previous four fingerings are very ergonomic to play. However, the new fingerings involve having to flex the index finger a lot. This can introduce a lot of unwanted tension into your fretting-hand if you’re not careful.
Now that we’ve looked at the fingerings, let’s do an exercise that will help you to master them…
Octave Memorization Exercise 2: Practice For Five Minutes
This exercise should be practiced in a similar manner to the first exercise that we covered in the first octave lesson. In addition to what I recommend in that lesson, I also need to point out the following things…
- I use hybrid-picking to pick the notes of the octave. (This is when you use both your pick and fingers at the same time). If you look closely at the TAB, you’ll see that
- I am using a downstroke on the lowest-sounding note, and am using the third finger (a) to pick the highest-sounding note.
After you pick the octave, then individually pick the two strings that are being skipped. This will allow you to see if you are muting them effectively. Although we aren’t strumming the octaves in this exercise, it is still a good idea to pay close attention to muting.
An Example Lick
Let’s now take a look at a guitar lick that uses the new fingerings—I might even sneak fingerings from the first lesson into it as well. 🙂
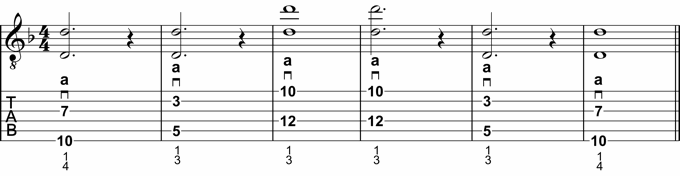
Example Lick: D Natural Minor Scale
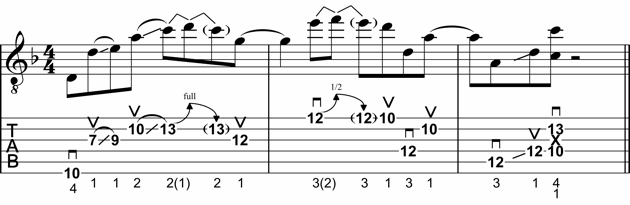
Remember that this lick is just an example, and you don’t need to learn it. But make sure that you at least analyse the lick and find as many octaves in it that you can.
A Few Last Words
That’s all for this very short series of lessons on octave fingerings. I hope you enjoyed them, and I also hope that you’ll take the time to experiment with octaves in your own playing. If you do that, I have no doubt that you’ll come up with lots of cool stuff.
Have fun!
Return To: Guitar Fretboard Knowledge Lessons