In this guitar lesson we’re going to look at a fantastic exercise that will help increase your ability to stretch your first and second fingers apart. This is an essential fretting-hand skill to develop, but many guitarists don’t really put any focused practice time into it.
Why Even Bother?
You might be wondering why it’s essential. Well, probably one of the biggest benefits of having the ability to stretch between fingers 1 and 2 is that it makes playing certain scale fingerings much easier. To see what I mean, check out the following fingering for the C Major scale…
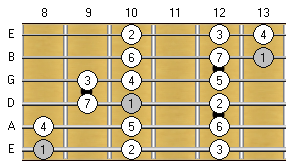
The main thing you should pay attention to on the diagram above are the notes on the thick E-string and A-string. Notice how on these strings you need to play two whole-steps in a row. For Example: On the thick E-string you need to do the following…
- Play the note C at the 8th fret.
- Play the note D at the 10th fret.
- Play the note E at the 12th fret.
If you’re like most of the people I’ve taught, then the easiest (and safest) way to play this would be to…
- Play the C note using your first finger.
- Play the D note using your second finger.
- Play the E note using your fourth finger.
If you use what I’ve recommend above, then you would need the ability to stretch a whole-step between your first and second finger. [Side Note: This specific stretch between fingers 1 and 2 is needed, not just in the scale fingering above, but in many scale fingerings. It’s also needed to play many different guitar licks and other musical ideas. So it’s important that you master it].
The Exercise
The good news is that developing a decent stretch between your first and second finger is not hard. It just takes a small amount of practice done consistently every time you practice. Let’s take a look at a specific exercise that will help develop this stretch…
Stretching Exercise 1: Practice For Five Minutes
Here’s how to do this exercise…
Step 1:
On the thick E-string, place your fingers in the following locations…
- Finger 1 is at the 9th fret.
- Finger 2 is at the 10th fret.
- Finger 3 is at the 11th fret.
- Finger 4 is at the 12th fret.
Make sure that all four fingers are pressing down at the same time.
Step 2:
While keeping Fingers 2, 3, and 4 still pressing down, stretch your first finger out so that it is now fretting at the 8th fret. You should feel a gentle stretching sensation between fingers 1 and 2.
Step 3:
Hold this position for around ten seconds. Focus on your breathing, and check that you aren’t holding your breath. Also make sure that your second finger doesn’t lean towards the first finger. Keep it as upright as you can.
Step 4:
Repeat Steps 1 to 3 for each of the following strings…
- A-string.
- D-string.
- G-string.
- B-string.
- Thin E-string.
Step 5:
Move down one fret and repeat Steps 1 to 4.
As always, I highly recommend watching the video that comes with this lesson. It’s really hard to describe this exercise adequately with text, and you’ll miss some of the important details if you don’t watch me demonstrating the exercise.
Practice Recommendations
To help you practice this exercise in a way that allows you to benefit the most from it, I recommend paying close attention to these suggestions…
- Practice the exercise at the end of your practice session. It’s important that your muscles are fully warmed up before you practice the exercise. If you practice it when you’re not warmed up, then the likelihood of pain or injury is higher.
- Use the classical sitting position and the classical hand position. Using these will make doing wide stretches much easier and safer. If you try doing wide stretches repeatedly using an unergonomic sitting or hand position, then you’re just inviting injury.
- Stop if you feel any pain. When you do the exercise you should only feel a gentle stretching sensation between your first and second fingers. You should never feel pain doing this exercise. If you feel pain, then it means you either have to move the exercise higher up the neck, or there is something fundamentally wrong with your technique. If that’s the case, then you need to book a few lessons with a good local guitar tutor so that they can analyze your technique. Investing money in lessons to correct your technique is going to be way cheaper than the medical costs that you would accumulate if you seriously injure yourself!
- Adjust the exercise to your hand size. If you have very large hands, then you might have to start the exercise lower than the 9th fret. On the other hand, if you have small hands then you might have to start the exercise at a higher fret location. Your first practice session of the exercise should be used to experiment to find the ideal starting position for your hand size and current flexibility.
- Aim to be able to do the exercise starting at the 2nd fret. A good goal to work towards is the ability to do the exercise comfortably at the 2nd fret. Take your time working towards this goal. It could take weeks or months of consistent practice until you become flexible enough. Don’t be impatient by trying to force it.
A Few Last Words
I hope you give this this exercise your best effort. It’s a simple one to practice, but it will really help with developing the stretch between your first and second finger. And remember to be patient, and work the exercise down the guitar neck in a gradual manner. There’s no rush. 🙂
Have fun!
Return To: Guitar Technique Lessons